Applying floor graphics correctly makes the difference between a professional installation that lasts months and a disappointing result that peels within weeks. The process isn’t complicated, but it demands attention to detail, proper surface preparation, and the right technique. When done well, floor graphics transform retail spaces, guide visitors through exhibitions, reinforce branding in reception areas, and deliver messages exactly where people are looking down.
This guide walks you through the complete installation process, from preparation through troubleshooting, with practical insights that separate successful installations from frustrating failures.
What Success Looks Like
You’ll know you’re doing it right when the surface feels completely smooth and dry to touch, your spirit level shows perfect alignment before you commit, and air bubbles push out ahead of your squeegee rather than getting trapped behind it. Edges should lay flat immediately without curling back, and the finished graphic should have a uniform appearance with no visible pockets.
Before You Start: Installation Readiness Checklist
Surface Conditions:
- Floor temperature between 15°C and 25°C
- Surface completely dry (wait 24 hours minimum after final cleaning)
- No wax, polish, or residue present
- Grout lines cleaned thoroughly if working with tile
Environmental Conditions:
- Room temperature stable for 24 hours
- No direct sunlight heating the floor
- HVAC system not creating fluctuations
- Graphics acclimated to room temperature
Preparation:
- All tools gathered and ready
- Installation area marked clearly
- Graphics laid flat for final planning
- Adequate time allocated without rushing
If any item remains incomplete, address it before proceeding. Installing in suboptimal conditions wastes both materials and effort.
Tools and Materials You’ll Need
Essential items:
- Squeegee with felt edge
- Sharp craft knife or utility blade
- Spirit level or laser level
- Tape measure
- Masking tape
- Lint-free cloths
- Residue-free floor cleaner
- Rubbing alcohol
Optional but helpful:
- Heat gun or hairdryer
- Weighted roller for large areas
- Knee pads for comfort
- Application fluid for repositionable graphics
A quality squeegee represents a worthwhile investment that makes bubble removal considerably easier than improvising with credit cards or other makeshift tools.
Preparing Your Surface Properly
This step determines whether your floor graphic lasts three months or three years. The floor needs to be spotless, bone-dry, and smooth. When we say “spotless,” we mean zero dust, grease, wax, or any other residue. Run a white cloth across the area as a test. If it picks up dirt, you’re not done cleaning yet.
Start with a residue-free floor cleaner, then follow with rubbing alcohol for a final wipe-down. This two-step approach removes oils that regular cleaning misses. After your final clean, wait a full 24 hours before installation. The surface might feel dry after an hour, but moisture trapped deeper in porous flooring takes time to evaporate. Skip this waiting period and you’ll see edge lifting within weeks.
Keep your installation space between 15°C and 25°C. Below that range, adhesives turn sluggish and won’t bond properly. Above it, graphics can bubble or wrinkle as you work. If you’re installing in a chilly space, warm it first and let your graphics come to room temperature before unwrapping them.

UK Climate Considerations
British weather throws specific challenges at floor graphics installation. Humidity swings wildly, especially in autumn and spring. On particularly damp days, even “dry” floors hold surface moisture that wrecks adhesion. If you’re working during humid conditions, run a dehumidifier for several hours beforehand.
Underfloor heating appears in many UK properties. If your installation site has it, switch it off 24 hours before you start and keep it off for 48 hours after finishing. The heat pulls moisture from the adhesive too quickly, weakening the bond before it sets properly.
Period properties and older buildings often feature uneven floors or wonky tiles. These surfaces require extra care because graphics bridge irregularities rather than conforming to them. Smaller graphics generally cope better with these imperfections than large ones.
Surface-Specific Application Guidance
| Surface Type | Preparation Required | Application Difficulty | Key Consideration | Expected Adhesion |
| Smooth Vinyl/Linoleum | Standard cleaning | Easy | Ideal surface, minimal issues | Excellent |
| Ceramic/Porcelain Tile | Deep grout cleaning | Moderate | Grout creates weak points | Good with multiple passes |
| Sealed Concrete | Standard cleaning | Easy | Similar to vinyl | Excellent |
| Unsealed Concrete | Sealer application needed | Difficult | Highly porous | Poor without sealing |
| Low-Pile Carpet | Thorough vacuuming | Moderate | Needs special product | Good with correct type |
| Textured/Rough Surfaces | Depends on severity | Difficult | May need professional help | Variable |
Smooth vinyl and linoleum give you the easiest time. The non-porous surface lets the adhesive make complete contact without fighting texture or absorption issues.
Ceramic or porcelain tile brings grout lines into play as your main headache. Graphics span these lines rather than dipping into them, creating potential weak points. Combat this by making multiple firm passes with your squeegee over grout areas.
Concrete behaves differently depending on whether it’s sealed. Sealed concrete works almost as well as vinyl. Unsealed concrete might need sealing first because the porous surface won’t give the adhesive anything solid to grip. Not sure about your concrete? Test a small square in a corner first.
Carpet demands its own product category entirely. Standard floor graphics won’t stick to carpet fibres no matter what you do. Before applying carpet-specific versions, vacuum thoroughly to remove every loose fibre you can find.

Step-by-Step Installation Process
Start by positioning the graphic with its backing paper still intact. Use masking tape to mark exactly where it belongs, then check alignment with your spirit level. Graphics that sit crooked look amateur even when every other aspect is perfect.
Fold the graphic lengthwise down the middle without creating a sharp crease. Peel the backing liner from one half only. You’ll see some installers rip off the entire backing at once, but this approach creates problems. Exposed adhesive attracts every dust particle in the room, positioning becomes impossible, and you’ll fight massive bubble issues.
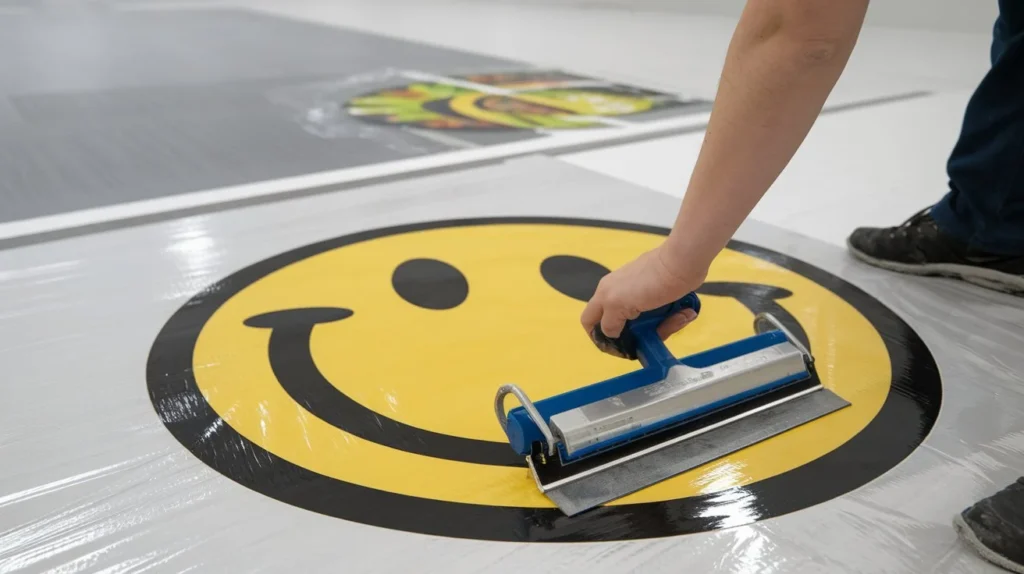
Lay the exposed half onto the floor, starting from that centre fold line. Now grab your squeegee and apply solid, even pressure whilst working from the middle out towards the edges. This motion pushes trapped air ahead of the squeegee rather than locking it underneath.
Each stroke should overlap the previous one by roughly a third. These overlaps matter because gaps between passes create channels where air collects into those stubborn bubbles you’ll curse later.
Move to the second half. Peel its backing liner, position it carefully, and repeat the same centre-to-edge squeegee technique. When you reach edges and corners, press harder. These spots take the most stress during daily use and they’ll lift first if the bond is weak. Your forearm should feel genuinely tired after a large installation. If it doesn’t, you probably didn’t press hard enough.
Post-Installation Quality Check
Right after finishing, run through a proper inspection. Slide your hand across the entire surface. It should feel uniform with no bumps or soft spots. Press on edges to verify they’re not lifting. Corners deserve special attention because they fail before anything else if something goes wrong. Look at low angles to reveal imperfections hidden from above.
Come back after 24 hours for a second look. Monitor whether any small bubbles have reduced, edges stay firmly down, and corners remain rock-solid. If problems appear now that weren’t there yesterday, you’re looking at environmental causes rather than installation mistakes.
Common Mistakes That Ruin Installations
Rushing surface preparation: Just because a floor looks clean doesn’t mean it’s ready. Many all-purpose cleaners deposit invisible oils or residues that prevent adhesion. The floor appears spotless but it’s coated with a microscopic layer that ruins bonding.
Working in cold rooms: Even if you’re comfortable in 12°C, your adhesive isn’t performing anywhere near its potential. This single factor kills more installations than most people realize.
Removing all backing paper at once: This looks like it’ll save time. It won’t. The approach creates bubble problems that take twice as long to fix as you “saved” with this shortcut.
Light squeegee pressure: Gentle pressure feels safer but it won’t trigger the adhesive properly. You need real force to activate proper bonding.

Troubleshooting Installation Problems
Air Bubbles
Bubbles appearing whilst you’re still installing mean you’re not pressing hard enough or your squeegee technique needs work. Increase your pressure and make sure each stroke overlaps the last one properly.
Small bubbles that show up hours after you’ve finished usually come from the adhesive releasing trapped gases or moisture working its way out. These typically vanish within 48 hours without intervention. Large bubbles that refuse to disappear suggest contamination on the surface or incompatible adhesive chemistry. Pierce them with a pin, squeeze the air out, and reseal with heavy squeegee pressure. If they come back, your surface preparation was inadequate.
Wrinkles and Creases
These happen when you yank the backing liner off too quickly or don’t keep tension whilst positioning. Minor wrinkles sometimes relax if you apply gentle heat from a hairdryer, but deep creases are permanent. The only real fix is prevention. Remove backing slowly and keep the graphic taut without actually stretching it.
Edge Lifting
Immediate lifting points to either surface contamination or weak pressure during installation. Delayed lifting that appears days or weeks later tells a different story. You’re looking at environmental culprits such as temperature swings, moisture infiltration, or heavy foot traffic before the adhesive fully cured.
Graphics Won’t Stick
If your graphic refuses to bond despite thorough cleaning, the surface might have a release agent or wax coating that ordinary cleaners can’t shift. Try rubbing alcohol or a dedicated wax stripper. Still not working? Light sanding with fine-grit paper sometimes helps, though test this in a hidden corner first.
Should You Install Yourself or Hire Professionals?
Handle it yourself if:
- You’re working with graphics under 3 square metres
- The floor is smooth and even
- You’ve got time to redo it if needed
- You’re comfortable with detailed manual work
- Your expectations are realistic about the result
Get professional help if:
- You’re dealing with graphics over 5 square metres
- The design involves multiple pieces that must align perfectly
- Your floor is textured, heavily grouted, or uneven
- The location is high-profile and appearance is critical
- You’ve never done this before and can’t afford mistakes
At Magenta Signs, we work with clients to match installation approach to project complexity. Professional costs vary depending on project size, your location, surface conditions, and scheduling requirements. Once you’ve mastered the installation process, exploring creative applications for floor vinyl can help you maximize visual impact throughout your space.
Installation Timeline by Scenario
Small retail decal (under 1 square metre): Surface prep 15 minutes, application 10 to 15 minutes, inspection 5 minutes. Total: 30 to 35 minutes.
Medium promotional graphic (1 to 3 square metres): Surface prep 25 to 30 minutes, application 20 to 30 minutes, inspection 10 minutes. Total: 55 to 70 minutes.
Large directional system (5+ square metres): Surface prep 45 to 60 minutes, application 60 to 90 minutes, inspection 15 minutes. Total: 2 to 2.5 hours.
First-timers should double these estimates. You’ll get faster with practice, but your first installation will take longer than you expect. For temporary event installations, understanding how exhibition floor graphics boost brand presence helps you plan both installation timing and design strategy for maximum visitor engagement.

Maintaining Your Floor Graphics
Don’t clean newly installed graphics for 48 to 72 hours. During this period, the adhesive is forming chemical bonds with the floor surface at a molecular level. Introducing moisture or cleaning products too early disrupts this bonding process, potentially causing complete failure even when the installation looked perfect initially.
When you do start cleaning, use appropriate products that won’t degrade the print or adhesive. Harsh chemicals containing solvents or strong alkalis will destroy both. Never use a pressure washer. The high-pressure water forces its way under edges and creates lifting that spreads across the entire graphic.
Lifespan depends heavily on foot traffic. High-traffic retail environments see shorter performance, moderate traffic areas last longer, and protected low-traffic spaces can exceed expectations significantly. At Magenta Signs, we help clients plan realistic replacement schedules based on their actual traffic patterns and maintenance practices. When replacement time arrives, employing safe removal practices for vinyl graphics prevents surface damage and prepares the area for fresh installations.
Frequently Asked Questions
Can I reposition floor graphics after applying them?
Standard graphics use permanent adhesive that bonds on contact. Once you’ve pressed them down, they’re staying put. Repositionable versions exist with different adhesive formulations, but you need to specify this requirement when ordering because they cost more.
Will floor graphics damage my flooring?
Quality graphics use adhesives engineered not to harm flooring during removal. The key is peeling slowly at a shallow angle. Any residue left behind comes off with adhesive remover made for floor use. Always test removers in a hidden spot first to verify compatibility.
Can I install floor graphics on the carpet?
Only if you’re using products specifically designed for textile surfaces. The adhesive chemistry is completely different from standard floor graphics.
Do I need special tools?
A felt-edged squeegee is the only specialist item required. Everything else is standard: craft knife, tape measure, level, and cleaning supplies. You probably have most of it already.
Ready to Install Your Floor Graphics
Success comes down to three essentials: thorough surface preparation, appropriate environmental conditions, and patient application technique. Assess your situation honestly using the decision framework above, gather every tool before starting, verify conditions beforehand, and allow enough time to work without rushing.
For straightforward installations on good surfaces, this guide will get you professional results if you follow it carefully. For complex projects or situations where appearance is genuinely critical, professional installation removes the risk and guarantees optimal results from the start. Floor graphics work most effectively as part of an integrated signage approach that creates cohesive branded environments.
Contact us to discuss your specific floor graphics project. We can advise whether your situation suits DIY installation or would benefit from professional expertise, and provide guidance on materials and techniques for your particular flooring type.